Setting Up pfSense VM
In this blog post, I’ll walk you through the process of setting up a pfSense VM on Proxmox for managing network traffic, creating VLANs, and establishing a software-defined network (SDN). This detailed guide covers pfSense installation, VLAN configuration, and firewall rule setup for effective network segmentation, including VLANs for vulnerable machines and containerized applications.
Installing pfSense on Proxmox
To start, I created a new VM in Proxmox with the following specifications:
- RAM: 4GB
- CPU Cores: 2
- Disk Space: 20GB
- Network Interfaces:
- WAN: Connected to
vmbr2(isolated virtual bridge) - LAN: Connected to
vmbr1(isolated LAN bridge)
- WAN: Connected to
Step-by-Step Installation:
- Download the pfSense ISO:
- I downloaded the latest pfSense ISO from the official website.
- Create a New VM in Proxmox:
- Clicked Create VM in the Proxmox web interface.
- Set the VM name to
pfSenseand selected the pfSense ISO as the installation media. - Configured the VM hardware with 4GB RAM, 2 CPU cores, and a 20GB virtual disk.
- Attached the WAN interface to
vmbr2and the LAN interface tovmbr1.
- Boot and Install pfSense:
- Booted the VM and followed the pfSense installer prompts.
- Chose the default installation option and selected the entire disk with the
ZFSfilesystem. - Set the root password and completed the installation.
- After installation, the VM rebooted, and I removed the ISO image.
Initial Network Configuration:
- Assign Interfaces:
- Assigned
vtnet0as the WAN interface (connected tovmbr2) andvtnet1as the LAN interface (connected tovmbr1).
- Assigned
- Configure IP Addresses:
- WAN Interface (
vtnet0): Set to static IP10.0.0.1/24. - LAN Interface (
vtnet1): Set to static IP192.168.1.1/24. - Disabled DHCP on the WAN interface and enabled it on the LAN interface.
- WAN Interface (
- Access pfSense Web Interface:
- Opened a browser and navigated to
https://192.168.1.1to access the pfSense web GUI. - Logged in with the default credentials (
admin/pfsense).
- Opened a browser and navigated to
Creating and Assigning VLANs in pfSense
To segment the network and enhance security, I configured the following VLANs:
- VLAN 2020 (Main): Tagged on the LAN interface (
vtnet1), IP192.168.20.1/24. - VLAN 2121 (Active Directory): Tagged on the LAN interface (
vtnet1), IP192.168.30.1/24. - VLAN 2222 (Honeypot): Tagged on the LAN interface (
vtnet1), IP192.168.40.1/24. - VLAN 2323 (Vulnerable Machines): Tagged on the LAN interface (
vtnet1), IP192.168.50.1/24. - VLAN 2424 (Containerization): Tagged on the LAN interface (
vtnet1), IP192.168.60.1/24.
Step 1: Create VLANs
- Go to Interfaces > Assignments > VLANs and click Add.
- For each VLAN, specify the VLAN ID and tag it on the LAN interface (
vtnet1).

Step 2: Assign VLAN Interfaces
- Go to Interfaces > Assignments.
- Click + Add to assign a new interface for each VLAN.
- Rename the interfaces and assign the IP addresses:
- VLAN2020:
192.168.20.1/24 - VLAN2121:
192.168.30.1/24 - VLAN2222:
192.168.40.1/24 - VLAN2323:
192.168.50.1/24 - VLAN2424:
192.168.60.1/24
- VLAN2020:
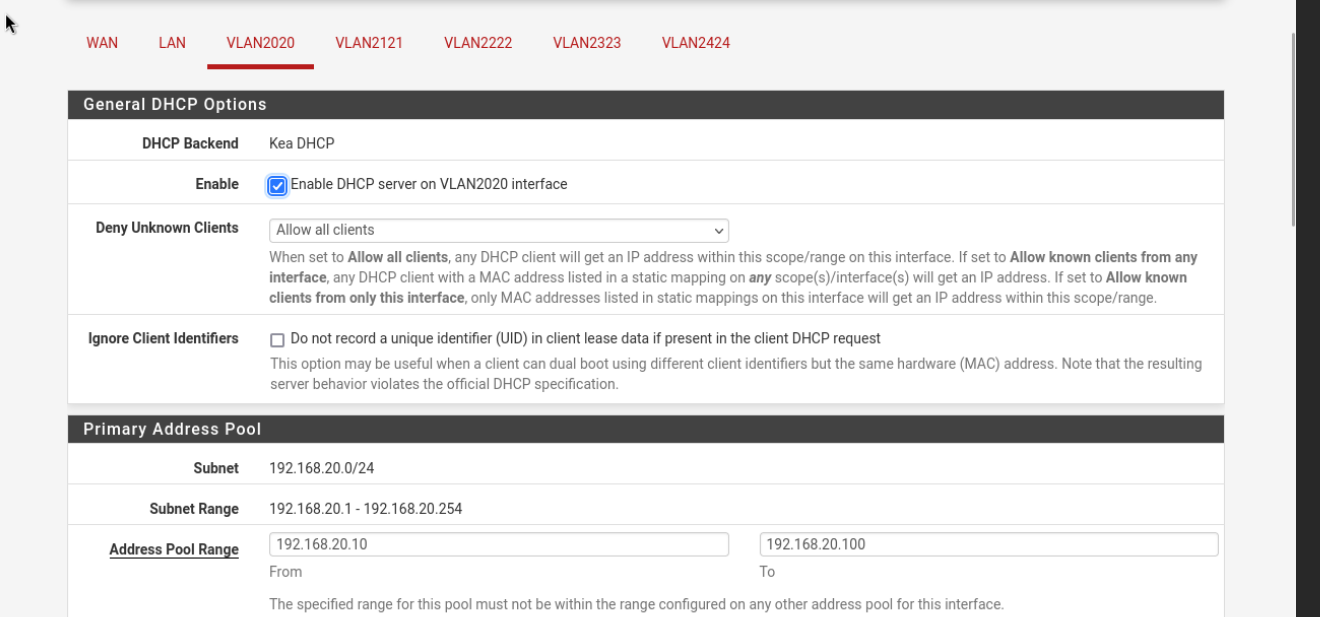
Step 3: Enable DHCP for Each VLAN
- Go to Services > DHCP Server.
- Enable DHCP and set the IP range for each VLAN:
- VLAN2020:
192.168.20.10 - 192.168.20.100 - VLAN2121:
192.168.30.10 - 192.168.30.100 - VLAN2222:
192.168.40.10 - 192.168.40.100 - VLAN2323:
192.168.50.10 - 192.168.50.100 - VLAN2424:
192.168.60.10 - 192.168.60.100
- VLAN2020:
e.g:
Configuring Firewall Rules for VLANs
Firewall rules were created to control traffic between VLANs and to the internet based on their intended use:
VLAN 2020 (Main VLAN):
- Allow Full Internet Access:
- Action: Pass
- Protocol: Any
- Source: VLAN 2020 net
- Destination: Any
- Allow Access to VLAN 2323 (Vulnerable Machines):
- Action: Pass
- Protocol: Any
- Source: VLAN 2020 net
- Destination: VLAN 2323 net
- Description: Allow access from Main VLAN to Vulnerable Machines VLAN.
- Block Access to VLAN 2222 (Honeypot):
- Action: Block
- Protocol: Any
- Source: VLAN 2020 net
- Destination: VLAN 2222 net
VLAN 2121 (Active Directory VLAN):
- Allow Limited Internet Access (HTTP/HTTPS Only):
- Protocol: TCP
- Source: VLAN 2121 net
- Destination Port: 80, 443
- Block All Other Internet Traffic:
- Action: Block
- Source: VLAN 2121 net
- Allow Access to VLAN 2020:
- Source: VLAN 2121 net
- Destination: VLAN 2020 net
VLAN 2222 (Honeypot VLAN):
- Block Access to All Internal Networks:
- Source: VLAN 2222 net
- Destination: Any internal VLAN
- Allow Internet Access Only:
- Destination: Any (non-RFC1918 addresses)
VLAN 2323 (Vulnerable Machines VLAN):
- Isolate from All Other VLANs Except VLAN 2020:
- Action: Block
- Destination: Any internal VLAN except VLAN 2020
- Allow Internet Access for Vulnerability Testing:
- Protocol: Any
- Source: VLAN 2323 net
VLAN 2424 (Containerization VLAN):
- Allow Full Access to All VLANs:
- Source: VLAN 2424 net
- Destination: Any
Conclusion
This detailed configuration of pfSense with VLANs, including dedicated segments for vulnerable machines and containerization, provides robust network segmentation and control. The firewall rules are tailored to meet specific security and access needs, allowing for flexibility in the lab environment.
Next Steps
With pfSense and the VLANs configured, I will next set up OpenVPN for secure remote access.
This post is part of Jad’s Cybersecurity Blog.